
COMMERCIAL CCTV DESIGN
Plan a commercial camera layout around the places that matter.
Start with entrances and vulnerable areas, then choose the view each camera needs to deliver. A warehouse with an attached office needs several purposeful views, not one wide camera trying to see everything.
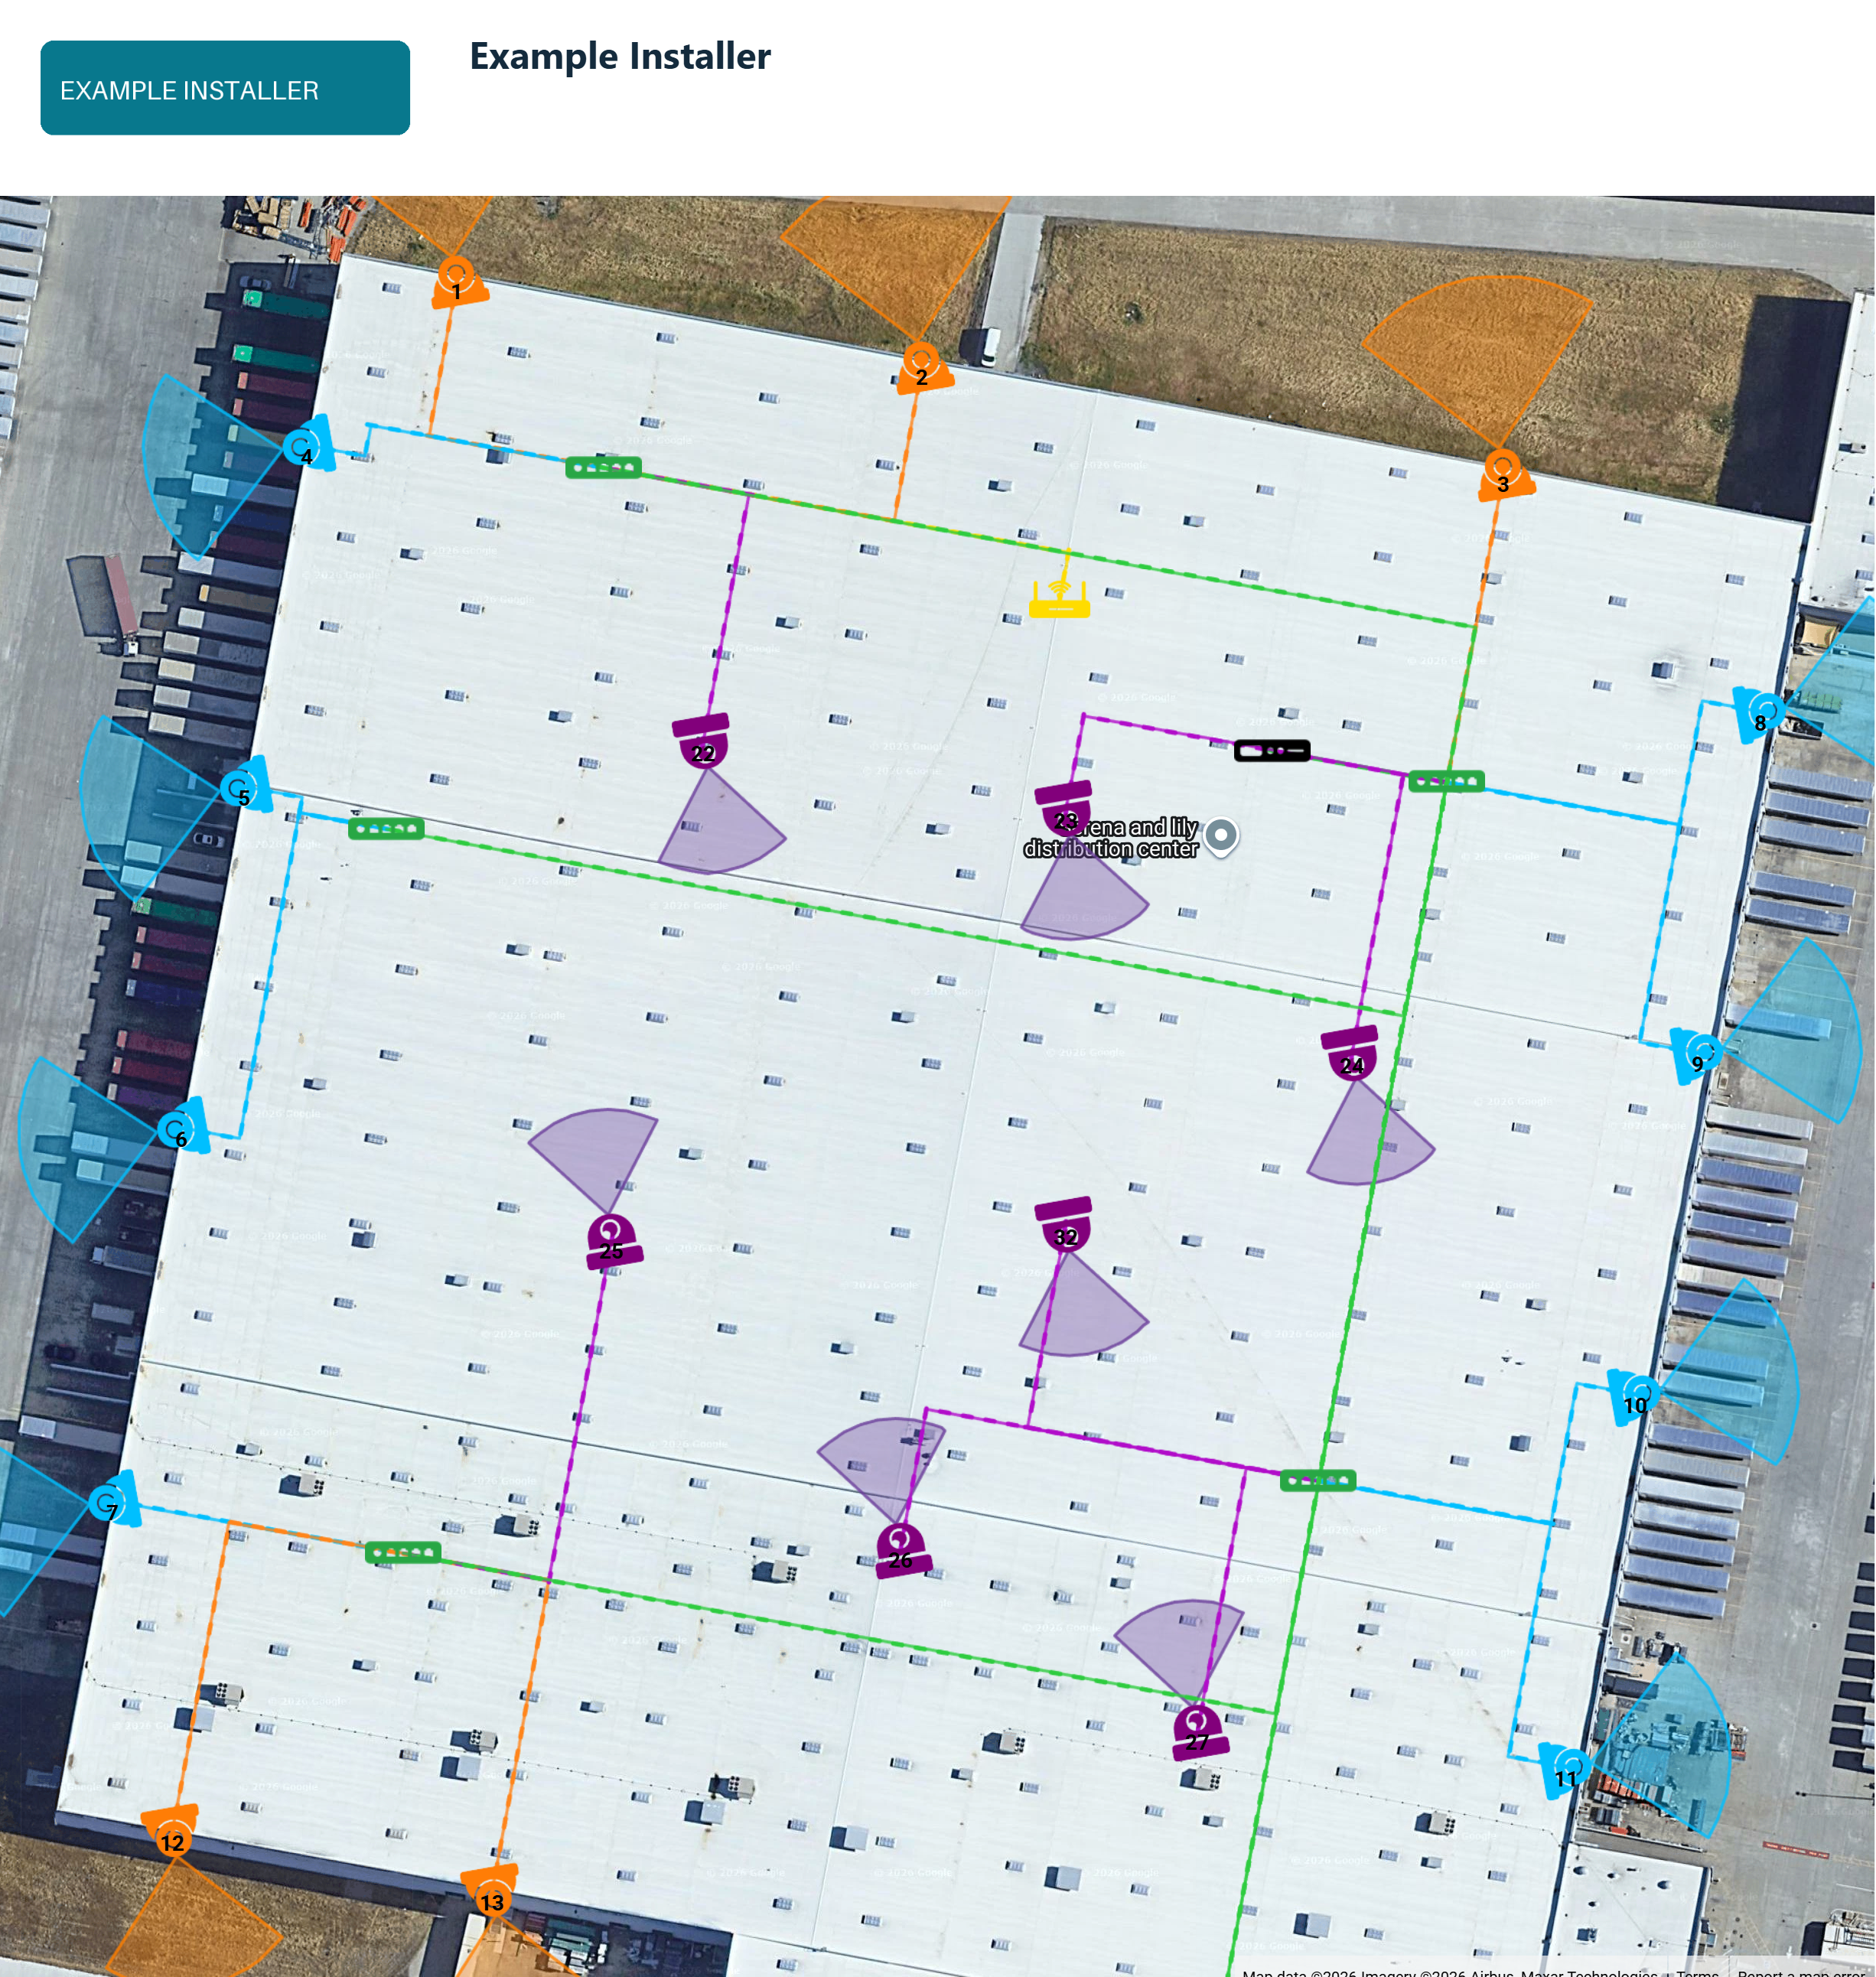
Explore the 32-camera commercial example
This proposed layout combines 21 exterior turrets, 11 interior domes, seven PoE switch locations, two access points and one 32-channel NVR. Cyan cameras cover loading areas, orange covers approaches and purple marks proposed interior positions.
Open the read-only example full-screen →
Follow the routed camera cables to the nearby switches and the proposed fiber backbone to the central recorder. The detail above focuses on the warehouse network; open the interactive map to see the complete site.
1. Write down what each view must answer
Walk the property with the person responsible for security and the installer. Mark public entrances, employee doors, emergency exits, loading doors, gates and transitions into restricted areas. Mark where money or product is stored, including cash-handling rooms, safes, stock cages and high-value inventory. Add vulnerable spots such as outdoor equipment and isolated walkways. Record opening hours and when lighting changes.
Give every proposed camera a job: show who entered the office, follow a delivery into the warehouse, or establish what happened beside a loading bay. An overview is useful for context, while a tighter view may be needed to capture useful detail at a doorway. Those can be separate cameras.
Use a numbered camera list alongside the map. For each position, record its target area, viewing direction, mounting surface, lighting and the question the footage should answer. The same names should appear in the installer’s schedule and the finished recorder.
2. Cover entry points before filling the gaps
| Area | Placement priority | Check on site |
|---|---|---|
| Main office entrance | Capture people as they approach or pass through a controlled doorway. | Faces, backlighting, door swing and the angle from the proposed mounting point. |
| Employee and side doors | Cover each access path, including routes that bypass reception. | Can a person walk under the camera or disappear behind a parked vehicle? |
| Loading bays | Show the bay and its approach; add a closer view where goods change hands. | Truck positions, raised doors, pallets and changes between bright daylight and interior light. |
| Warehouse aisles | Look along useful travel paths and toward stock access points. | Full-height racks, changing stock levels, forklifts and cross-aisle obstructions. |
| Where money or product is stored | Prioritize access to safes, cash-handling areas, stock rooms and high-value inventory. Capture who enters and leaves, plus a useful view of goods being handled or removed; use separate detail and overview views where one camera cannot do both. | Test with safe and stock-room doors open, shelves stocked and staff working normally. Check whether bodies, shelving, counters or stacked cartons hide the handling area. Verify that faces and the relevant items are usable in recorded footage, while keeping PIN entry and sensitive paperwork out of view. |
| Office-to-warehouse access | Document movement between areas with different access expectations. | Doorways, partitions and whether a wide overview loses the needed detail. |
| Parking and yard | Cover pedestrian approaches, gates and vulnerable equipment. | Night lighting, headlights, vegetation and vehicles blocking lower views. |
Give cash and valuable stock their own coverage objective
A general aisle view may show that someone visited a storage area without showing which goods were taken or returned. Identify the handling point and the access route together: the stock cage gate, safe approach, dispatch counter or high-value shelf. Pair a contextual view with a closer view where needed, and check both with the business owner using normal working positions. Aim for useful evidence of access and movement without recording keypad combinations or unnecessary document detail.
Use mounting height to serve the view
A high mounting point can protect equipment and show more of the site, but a steep downward view may show the top of a head instead of a face. There is no single correct mounting height for every commercial camera. Check the target’s distance and the camera’s actual view from the proposed position before fixing a bracket.
Do not draw coverage through walls
A map cone shows intended direction and extent; it does not make an opaque wall, rack or truck transparent. Place indoor cameras using a suitable building plan and walk the aisles. Use complementary angles at important transitions so that someone leaving one view enters another useful view. Keep fields of view focused on the business’s security needs.
For a broader placement workflow, see our security camera system planning guide. For outdoor approaches, see driveway and approach coverage.
3. Check detail, lighting and movement together
A wide view can show activity across a yard while providing too little detail at its far edge. Compare the manufacturer’s horizontal field of view at your target distance, rather than choosing a lens by its focal length alone. Our 2.8mm versus 4mm guide explains the tradeoff, and the coverage calculator estimates scene width.
Pixel density is a planning aid, not a promise that every face or object will be usable. Light direction, exposure, movement, compression and optics also affect the result. Test a person walking through the intended capture area rather than judging only a still image. Axis’s pixel-density guidance explains why the operational objective matters.
Check entrances with the door open and closed, loading areas with a vehicle present, and outdoor views after dark. Bright sky behind a doorway can be difficult; reflected infrared light from a nearby wall or overhang can also spoil a night image. Specify the needed camera capabilities for the scene and verify them in place. See Axis’s image-usability guidance for environmental considerations.
If reading vehicle plates is an objective, treat it as a dedicated design task. A general yard overview is not automatically a plate-capture view. Speed, approach angle, illumination and the camera’s exposure settings need their own assessment.
4. Give the cameras a practical path back to the recorder
Place the recorder and network equipment in a suitable secured indoor location with power, ventilation and service access. Mark the PoE switch and draw each planned cable route along the building’s usable pathways. Include changes of direction and identify vertical runs, penetrations and areas that need the installer’s inspection.
In CCTV Mapper, use device connections and edit their cable bends to show the route. The map measures the drawn route; allow separately for vertical drops, service loops and termination. A camera connected to a PoE NVR uses that recorder’s compatible camera port, while a camera on the network normally reaches the recorder through the network switch. Check the actual equipment topology before buying.
Count available ports and compare the switch’s total PoE budget with the devices’ requirements, including higher-power operating modes. Check the required PoE standard on each port, not just the overall wattage. For a long building or detached structure, ask the installer to design a suitable uplink instead of assuming any drawn copper run is acceptable.
Use the storage and PoE calculators to compare recording duration, average bitrate and power demand. Confirm the recorder’s supported incoming bandwidth, channel count and storage configuration. For a PC-based system, see planning a Blue Iris network.
5. Share a design the client and installer can use
Use consistent device names and colors to distinguish exterior coverage, interior cameras and network equipment. Record unresolved decisions in notes: a mounting point that needs inspection, a cable path awaiting access, or a doorway that needs a night test. A clear draft makes those decisions visible before installation.
Share the map with the client for coverage discussion, then export the map and equipment information for the installation team. Diamond and Unlimited accounts can save a company logo and contact details once and reuse that branding on shared maps and new PDF or image exports. Learn more in the sharing and export guide.
Commission the view, not just the device
After installation, confirm that every camera records, the timestamp is correct, and footage can be found and exported. Walk the important paths during operating hours and after dark. Check faces at entrances, loading activity with a truck present, and coverage when warehouse stock is in its normal position. At money and product storage areas, have an authorized staff member demonstrate a normal access and handling sequence. Review the recording to confirm that doors, their body or stacked goods do not hide the event and that the needed detail remains visible. Review access permissions and retention with the responsible business owner. Update the map to match the installed positions and routes.
The finished plan should tell the next person what each camera covers, where its connection goes and which details were verified on site.
Build your commercial camera layout
Map the site, place the devices and share a design your client can understand.
CCTV Mapper planning guide · Updated October 17, 2026